بسم الله الرحمن الرحيم
موضوع
طريقة اضافة نوافذ التسجيل
معاينة
وهذه صورة للاضافة :

وهذه صورة للاضافة :
تعمل مع :
...5, Safari 4
...7, Internet Explorer 6
...3, Firefox 2
...4, Google Chrome 3
...10, Opera 9
Torch,spark
نبدا بالشرح
خطوة 1 : اذهب للمدونة - قالب - تحرير html
خطوة 2 : ابحث عن <head> ضع الاكواد تحته (اسفله) :
<script type="text/javascript" src="https://0.s3.envato.com/files/3402416/javascript/jquery.min.js"></script>
<link rel="stylesheet" type="text/css" href="https://0.s3.envato.com/files/3402416/javascript/msgbox/jquery.msgbox.css" />
<script type="text/javascript" src="https://0.s3.envato.com/files/3402416/javascript/msgbox/jquery.msgbox.min.js"></script>
<style>
pre
{
white-space: pre-wrap;
padding:10px;
margin:0 0 10px 0;
width:98%;
overflow:auto;
overflow-y: visible;
}
#top
{
background:#FFFFFF none repeat scroll 0 0;
border-color:#464238;
border-style:solid;
border-width:25px 0;
color:#333333;
margin:0 auto;
padding:15px;
position:relative;
width:560px;
}
#top ul
{
list-style:inside square;
margin-bottom:10px;
}
.thumb img {
background:#EEEEEE none repeat scroll 0 0;
border:1px solid #AAAAAA;
padding:5px;
}
.thumb:hover img {
border-color:#777777;
}
#toc {
background:#CCEAFF none repeat scroll 0 0;
border:1px solid #0075D9;
color:#333333;
float:right;
margin:0 0 40px 10px;
padding:0 10px;
width:250px;
}
#toc h2 {
border:0 none;
color:#336699;
margin:10px 0 5px;
}
#toc a {
color:#336699;
}
.hastoc {
margin-right:0;
}
.hastoc {
margin-right:0;
}
.b {
font-weight:bold;
}
.doc {
list-style-type:none;
margin-left:0;
padding-left:0;
}
.doc li {
margin:5px;
padding:5px;
}
.doc li h5 {
color:blue;
font-size:1.2em;
margin:0 0 5px;
}
h1 small, h2 small, h3 small, h4 small, h5 small {
color:#333333;
font-size:0.7em;
font-weight:bold;
}
.doc li dl {
margin:5px 0 0;
}
.doc li dt {
font-weight:bold;
position:absolute;
text-transform:lowercase;
}
.doc li dd {
margin-left:80px;
}
#header #login-form {
float:right;
padding-top:5px;
width:330px;
}
#menu {
margin:0 27px;
overflow:hidden;
}
* html #menu {
height:1%;
}
#menu ul, #menu li {
list-style-image:none;
list-style-position:outside;
list-style-type:none;
}
#menu li {
background:#00B0D8 no-repeat scroll 0 0;
float:left;
}
#menu li a {
background:#FFFFFF none repeat scroll 0 0;
display:block;
float:left;
padding:4px 12px;
text-decoration:none;
}
#menu li.current a, #menu li a:hover {
background:transparent no-repeat scroll right top;
color:#FFFFFF;
text-decoration:none;
}
.message {
background:#00B0D8 no-repeat scroll 0 0;
color:#FFFFFF;
font-size:1.3em;
line-height:1.4em;
margin:0 auto 20px;
position:relative;
width:788px;
}
.message p {
background:transparent no-repeat scroll 0 100%;
margin:0;
padding:20px;
}
.message a{
color:#FFFFFF;
font-weight:bold;
}
.container {
-x-system-font:none;
background:white none repeat scroll 0 0;
border-bottom:1px solid black;
border-right:1px solid black;
color:#333333;
font-family:"Trebuchet MS",sans-serif;
font-size:1em;
font-size-adjust:none;
font-stretch:normal;
font-style:normal;
font-variant:normal;
font-weight:normal;
height:100%;
line-height:1.6em;
padding:15px 15px 50px;
width:900px;
}
td {
font-size:11px;
line-height:1.65em;
}
td strong {
font-size:13px;
}
td h2 {
padding-bottom:10px;
}
.download-widget {
border:1px solid #CCCCCC;
position:relative;
width:100%;
}
.download-widget td, .download-widget th {
background:#EEEEEE none repeat scroll 0 0;
margin:1px;
padding:5px;
}
.download-widget th {
background:#E0E0E0 none repeat scroll 0 0;
font-weight:bold;
text-align:left;
}
#login {
width: 238px;
margin: 0 auto;
padding:20px 0 0 43px;
background: url(sexyimages/user.png) no-repeat left center;
}
#login label {
display:block;
font-size:12px;
padding-bottom:5px;
text-align:right;
}
#login label em{
width:80px;
display:block;
float:left;
font-style: normal;
}
#login input {
width:146px;
height:22px;
border:1px solid #ccc;
}
#login input.submit {
width:auto;
height:auto;
border:1px solid #ccc;
float:right;
}
.img_container { height:130px; }
.img_container ul {display:block;padding:0;margin:0;list-style:none;}
.img_container ul li{float:left;width:100px;margin:10px;}
.img_container ul li a img {
width:93px;
height:93px;
border:1px solid #574331;
padding:5px;
background:#eee;
}
.imageborder img{
width:93px;
height:93px;
border:1px solid #574331;
padding:5px;
background:#eee;
float:left;
margin:0 10px;
}
.img_container ul li a:hover img, .imageborder:hover img { background:#e8e8e8; border-color: darkred; }
span.comment { color: #008080; font-weight: normal; }
span.oper { color: #0000f0; font-weight: normal; }
span.var { color: #d56000; font-weight: normal; }
span.func { color: #aa00ff; font-weight: normal; }
span.string { color: #777777; font-weight: normal; }
span.num { color: #990000; font-weight: bold; }
span.reg { color: #8d7f07; font-weight: normal; }
</style>


الكود 3 :
<button onclick='$.msgbox("jQuery is a fast and concise JavaScript Library that simplifies HTML document traversing, event handling, animating, and Ajax interactions for rapid web development.", {type: "info"});'>معاينة</button>
صورة للكود :

الكود 4 :
<button onclick='$.msgbox("An error 1053 ocurred while perfoming this service operation on the MySql Server service.", {type: "error"});'>معاينة</button>
<script type="text/javascript" src="https://0.s3.envato.com/files/3402416/javascript/jquery.min.js"></script>
<link rel="stylesheet" type="text/css" href="https://0.s3.envato.com/files/3402416/javascript/msgbox/jquery.msgbox.css" />
<script type="text/javascript" src="https://0.s3.envato.com/files/3402416/javascript/msgbox/jquery.msgbox.min.js"></script>
<style>
pre
{
white-space: pre-wrap;
padding:10px;
margin:0 0 10px 0;
width:98%;
overflow:auto;
overflow-y: visible;
}
#top
{
background:#FFFFFF none repeat scroll 0 0;
border-color:#464238;
border-style:solid;
border-width:25px 0;
color:#333333;
margin:0 auto;
padding:15px;
position:relative;
width:560px;
}
#top ul
{
list-style:inside square;
margin-bottom:10px;
}
.thumb img {
background:#EEEEEE none repeat scroll 0 0;
border:1px solid #AAAAAA;
padding:5px;
}
.thumb:hover img {
border-color:#777777;
}
#toc {
background:#CCEAFF none repeat scroll 0 0;
border:1px solid #0075D9;
color:#333333;
float:right;
margin:0 0 40px 10px;
padding:0 10px;
width:250px;
}
#toc h2 {
border:0 none;
color:#336699;
margin:10px 0 5px;
}
#toc a {
color:#336699;
}
.hastoc {
margin-right:0;
}
.hastoc {
margin-right:0;
}
.b {
font-weight:bold;
}
.doc {
list-style-type:none;
margin-left:0;
padding-left:0;
}
.doc li {
margin:5px;
padding:5px;
}
.doc li h5 {
color:blue;
font-size:1.2em;
margin:0 0 5px;
}
h1 small, h2 small, h3 small, h4 small, h5 small {
color:#333333;
font-size:0.7em;
font-weight:bold;
}
.doc li dl {
margin:5px 0 0;
}
.doc li dt {
font-weight:bold;
position:absolute;
text-transform:lowercase;
}
.doc li dd {
margin-left:80px;
}
#header #login-form {
float:right;
padding-top:5px;
width:330px;
}
#menu {
margin:0 27px;
overflow:hidden;
}
* html #menu {
height:1%;
}
#menu ul, #menu li {
list-style-image:none;
list-style-position:outside;
list-style-type:none;
}
#menu li {
background:#00B0D8 no-repeat scroll 0 0;
float:left;
}
#menu li a {
background:#FFFFFF none repeat scroll 0 0;
display:block;
float:left;
padding:4px 12px;
text-decoration:none;
}
#menu li.current a, #menu li a:hover {
background:transparent no-repeat scroll right top;
color:#FFFFFF;
text-decoration:none;
}
.message {
background:#00B0D8 no-repeat scroll 0 0;
color:#FFFFFF;
font-size:1.3em;
line-height:1.4em;
margin:0 auto 20px;
position:relative;
width:788px;
}
.message p {
background:transparent no-repeat scroll 0 100%;
margin:0;
padding:20px;
}
.message a{
color:#FFFFFF;
font-weight:bold;
}
.container {
-x-system-font:none;
background:white none repeat scroll 0 0;
border-bottom:1px solid black;
border-right:1px solid black;
color:#333333;
font-family:"Trebuchet MS",sans-serif;
font-size:1em;
font-size-adjust:none;
font-stretch:normal;
font-style:normal;
font-variant:normal;
font-weight:normal;
height:100%;
line-height:1.6em;
padding:15px 15px 50px;
width:900px;
}
td {
font-size:11px;
line-height:1.65em;
}
td strong {
font-size:13px;
}
td h2 {
padding-bottom:10px;
}
.download-widget {
border:1px solid #CCCCCC;
position:relative;
width:100%;
}
.download-widget td, .download-widget th {
background:#EEEEEE none repeat scroll 0 0;
margin:1px;
padding:5px;
}
.download-widget th {
background:#E0E0E0 none repeat scroll 0 0;
font-weight:bold;
text-align:left;
}
#login {
width: 238px;
margin: 0 auto;
padding:20px 0 0 43px;
background: url(sexyimages/user.png) no-repeat left center;
}
#login label {
display:block;
font-size:12px;
padding-bottom:5px;
text-align:right;
}
#login label em{
width:80px;
display:block;
float:left;
font-style: normal;
}
#login input {
width:146px;
height:22px;
border:1px solid #ccc;
}
#login input.submit {
width:auto;
height:auto;
border:1px solid #ccc;
float:right;
}
.img_container { height:130px; }
.img_container ul {display:block;padding:0;margin:0;list-style:none;}
.img_container ul li{float:left;width:100px;margin:10px;}
.img_container ul li a img {
width:93px;
height:93px;
border:1px solid #574331;
padding:5px;
background:#eee;
}
.imageborder img{
width:93px;
height:93px;
border:1px solid #574331;
padding:5px;
background:#eee;
float:left;
margin:0 10px;
}
.img_container ul li a:hover img, .imageborder:hover img { background:#e8e8e8; border-color: darkred; }
span.comment { color: #008080; font-weight: normal; }
span.oper { color: #0000f0; font-weight: normal; }
span.var { color: #d56000; font-weight: normal; }
span.func { color: #aa00ff; font-weight: normal; }
span.string { color: #777777; font-weight: normal; }
span.num { color: #990000; font-weight: bold; }
span.reg { color: #8d7f07; font-weight: normal; }
</style>
خطوة 3 : اذهب الى تخطيط ثم اضافة اداة ثم اختر html/javascript او داخل </body> في تحرير html مباشرة ثم ضع الكود المناسب لك . تحقق من المعاينة :
الكود 1 :
<button onclick="$.msgbox("The selection includes process white objects. Overprinting such objects is only useful in combination with transparency effects.");">معاينة</button>
صورة للكود :
الكود 2 :
<button onclick='$.msgbox("Are you sure that you want to permanently delete the selected element?", {type: "confirm",buttons : [{type: "submit", value: "Yes"},{type: "submit", value: "No"},{type: "cancel", value: "Cancel"}]}, function(result) { $("#result2").text(result); });'>معاينة</button>
صورة للكود :الكود 3 :
<button onclick='$.msgbox("jQuery is a fast and concise JavaScript Library that simplifies HTML document traversing, event handling, animating, and Ajax interactions for rapid web development.", {type: "info"});'>معاينة</button>
صورة للكود :
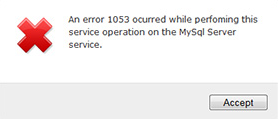
الكود 4 :
<button onclick='$.msgbox("An error 1053 ocurred while perfoming this service operation on the MySql Server service.", {type: "error"});'>معاينة</button>
صورة للكود :
الكود 5 :
<button onclick='$.msgbox("Insert your name below:", {type: "prompt"}, function(result) {if (result) {alert("Hello "+result);}});'>معاينة</button>
صورة للكود :

الكود 6 :
<button id="advancedexample1">معاينة</button>
بعد وضع الكود 6 في مكانه المخصص . يجب ان تبحث عن </body> وتضع قبله هذا الكود :
<script type="text/javascript">
$("#advancedexample1").click(function() {
$.msgbox("<p>In order to process your request you must provide the following:</p>", {
type : "prompt",
inputs : [
{type: "text", label: "Insert your Name:", value: "George", required: true},
{type: "password", label: "Insert your Password:", required: true}
],
buttons : [
{type: "submit", value: "OK"},
{type: "cancel", value: "Exit"}
]
}, function(name, password) {
if (name) {
$.msgbox("Hello <strong>"+name+"</strong>, your password is <strong>"+password+"</strong>.", {type: "info"});
} else {
$.msgbox("Bye!", {type: "info"});
}
});
});
</script>
صورة للكود :
 خطوة 5 : غير كلمة معاينة الى الكلمة المناسبة لك واللون الاصفر هو نص قابل للتغيير . لا تعرف كيف تضيف الاكواد او واجهت خطاً . اكتب المشكلة في قسم الاسئلة .
الكود 5 :
<button onclick='$.msgbox("Insert your name below:", {type: "prompt"}, function(result) {if (result) {alert("Hello "+result);}});'>معاينة</button>
صورة للكود :
الكود 6 :
<button id="advancedexample1">معاينة</button>
بعد وضع الكود 6 في مكانه المخصص . يجب ان تبحث عن </body> وتضع قبله هذا الكود :
<script type="text/javascript">
$("#advancedexample1").click(function() {
$.msgbox("<p>In order to process your request you must provide the following:</p>", {
type : "prompt",
inputs : [
{type: "text", label: "Insert your Name:", value: "George", required: true},
{type: "password", label: "Insert your Password:", required: true}
],
buttons : [
{type: "submit", value: "OK"},
{type: "cancel", value: "Exit"}
]
}, function(name, password) {
if (name) {
$.msgbox("Hello <strong>"+name+"</strong>, your password is <strong>"+password+"</strong>.", {type: "info"});
} else {
$.msgbox("Bye!", {type: "info"});
}
});
});
</script>
صورة للكود :